
Visit me at my new blog:
Skylark Knits
Friday, October 22, 2010
My first cabling experience
Well, my friend told me it was going to be easy.
I wasn't so sure. (Not that she would tell me a lie. She is a very honest person. That is one of the the qualities I love most about my friend.)
Anyhoo, I Googled "how to make a cable swatch" and came up with a very helpful link: Knitting Cables for Dummies. (This one looks like a helpful tutorial as well, but I didn't try that one last night: Learning Cable Stitches is Easy.)
So at 10:35 last night, I printed out the tutorial, cast on 14 stitches and got to work.
After about 10 minutes, this is what I had made:

Truth be told, I was a bit giddy about this little swatch. Considering that I am going to be doing a lot of cabling in my afghan, this was an important technique to learn.
On today's task list: learn how to make a bobble.
I wasn't so sure. (Not that she would tell me a lie. She is a very honest person. That is one of the the qualities I love most about my friend.)
Anyhoo, I Googled "how to make a cable swatch" and came up with a very helpful link: Knitting Cables for Dummies. (This one looks like a helpful tutorial as well, but I didn't try that one last night: Learning Cable Stitches is Easy.)
So at 10:35 last night, I printed out the tutorial, cast on 14 stitches and got to work.
After about 10 minutes, this is what I had made:

(Click on image to see larger version.)
Truth be told, I was a bit giddy about this little swatch. Considering that I am going to be doing a lot of cabling in my afghan, this was an important technique to learn.
On today's task list: learn how to make a bobble.
Thursday, October 21, 2010
How to cable
Again, I have never made cables. There is a lot of cabling going on in the afghan I am about to begin. My friend Alyce tried a cable swatch and said it was easy.
Yeah, we'll see.
How to make a bobble
After watching this, making a bobble doesn't look too hard.
Ask me again after I attempt making one!
The Great American Afghan
Several weeks ago, my two best knitting buddies and I were at a local yarn store. As we were browsing the magazine wall, one of my friends came across this book:

As we stood in the store, the wheels started turning in our heads and we thought about how much fun it would be to each buy a book and work on this afghan together. So Michelle and Alyce each bought a book and I had mine ordered since they only had two in stock.
We have spent quite a bit of time planning our afghans. Together we went through the book and picked out the patterns we liked and the patterns we did not want to include. I'm not sure who would want a crab on their afghan, but the three of us for sure do not. And the one that looks like the wooden shoe forms was a definite no as well. There were several others we omitted. I am very happy with the squares I chose for my afghan.
After I had decided which squares I was going to include, I needed to decide how to lay it all out. Here is my planning sheet:

I felt the need to roughly sketch the pattern for each block to make sure my "fallish" patterns were spread out and also to make sure I didn't have all my heavily cabled squares clumped together. This step was also important because I wanted to plan my colors.
The yarn I chose for this project is Cascade 220 Superwash. I love the feel of this wool. Plus, I can wash and dry it!
Here is my color palette for this project:


(Click on image to see larger version.)
As we stood in the store, the wheels started turning in our heads and we thought about how much fun it would be to each buy a book and work on this afghan together. So Michelle and Alyce each bought a book and I had mine ordered since they only had two in stock.
We have spent quite a bit of time planning our afghans. Together we went through the book and picked out the patterns we liked and the patterns we did not want to include. I'm not sure who would want a crab on their afghan, but the three of us for sure do not. And the one that looks like the wooden shoe forms was a definite no as well. There were several others we omitted. I am very happy with the squares I chose for my afghan.
After I had decided which squares I was going to include, I needed to decide how to lay it all out. Here is my planning sheet:

(Click on image to see larger version.)
I felt the need to roughly sketch the pattern for each block to make sure my "fallish" patterns were spread out and also to make sure I didn't have all my heavily cabled squares clumped together. This step was also important because I wanted to plan my colors.
The yarn I chose for this project is Cascade 220 Superwash. I love the feel of this wool. Plus, I can wash and dry it!
Here is my color palette for this project:

Extra Creme Cafe

Vinci

Cordovan

Emerald City

Aporto

Moss

Turtle

Gray

Sandalwood

Japanese Maple
I ordered a couple skeins from Jimmy Beans Wool yesterday and they have already shipped. Looking foward to casting on and beginning our first square next week. We plan to work on each square at the same time so we can work through any issues we are having. I have never cabled before or made a bobble, so our first square will be a challenge. So glad that we are going to be working on this together!
Pixie Striped Hat
A friend from church sent me a message on Facebook a couple of weeks ago. She had fallen in love with this hat on Etsy but didn't necessarily want to fork over $32 for one hat. So she emailed me to see if I would be interested in making a hat for her baby. Of course! I would love to make a hat for her baby!
She settled on this pattern and Malabrigo Rios yarn in Lettuce and Ravelry Red. Let me tell you right now, this yarn is very nice yarn to work with. I could just touch it all day long. It is so soft and wonderful!
Here it is after working just a short bit on it:

Unfortunately, I found after I cast on the correct number of stitches on a circular needle that I was not going to be able to use a circular needle for this hat. I didn't have enough stitches on my needle to even join the round. Frustrating! Fortunately, I had a set of DPNs in size 9, so I cast on and got to work.
I am a teensy bit concerned about the size of the hat so far. The yarn has good bounce to it (so it will stretch nicely and bounce back) but it seems small right now. It is sized for 0-4 months ... but I'm not convinced it will fit a newborn! It seems too small. I'll knit until I come to the decrease portion of the pattern and then decide if I need to make the next size up. Strange, huh?
I will also be making a matching hat for my friend's two year old son. How cute will those two brothers be in their matching hats for a Christmas photo shoot???
Oh, and the other day my friend Alyce also taught me how to join in the round when working on DPNs. She is just full of good tips and tricks! That was one part of knitting on DPNs that I always disliked. Now ... not so much.
She settled on this pattern and Malabrigo Rios yarn in Lettuce and Ravelry Red. Let me tell you right now, this yarn is very nice yarn to work with. I could just touch it all day long. It is so soft and wonderful!
Here it is after working just a short bit on it:

(Click on image to see larger version.)
Unfortunately, I found after I cast on the correct number of stitches on a circular needle that I was not going to be able to use a circular needle for this hat. I didn't have enough stitches on my needle to even join the round. Frustrating! Fortunately, I had a set of DPNs in size 9, so I cast on and got to work.
I am a teensy bit concerned about the size of the hat so far. The yarn has good bounce to it (so it will stretch nicely and bounce back) but it seems small right now. It is sized for 0-4 months ... but I'm not convinced it will fit a newborn! It seems too small. I'll knit until I come to the decrease portion of the pattern and then decide if I need to make the next size up. Strange, huh?
I will also be making a matching hat for my friend's two year old son. How cute will those two brothers be in their matching hats for a Christmas photo shoot???
Oh, and the other day my friend Alyce also taught me how to join in the round when working on DPNs. She is just full of good tips and tricks! That was one part of knitting on DPNs that I always disliked. Now ... not so much.
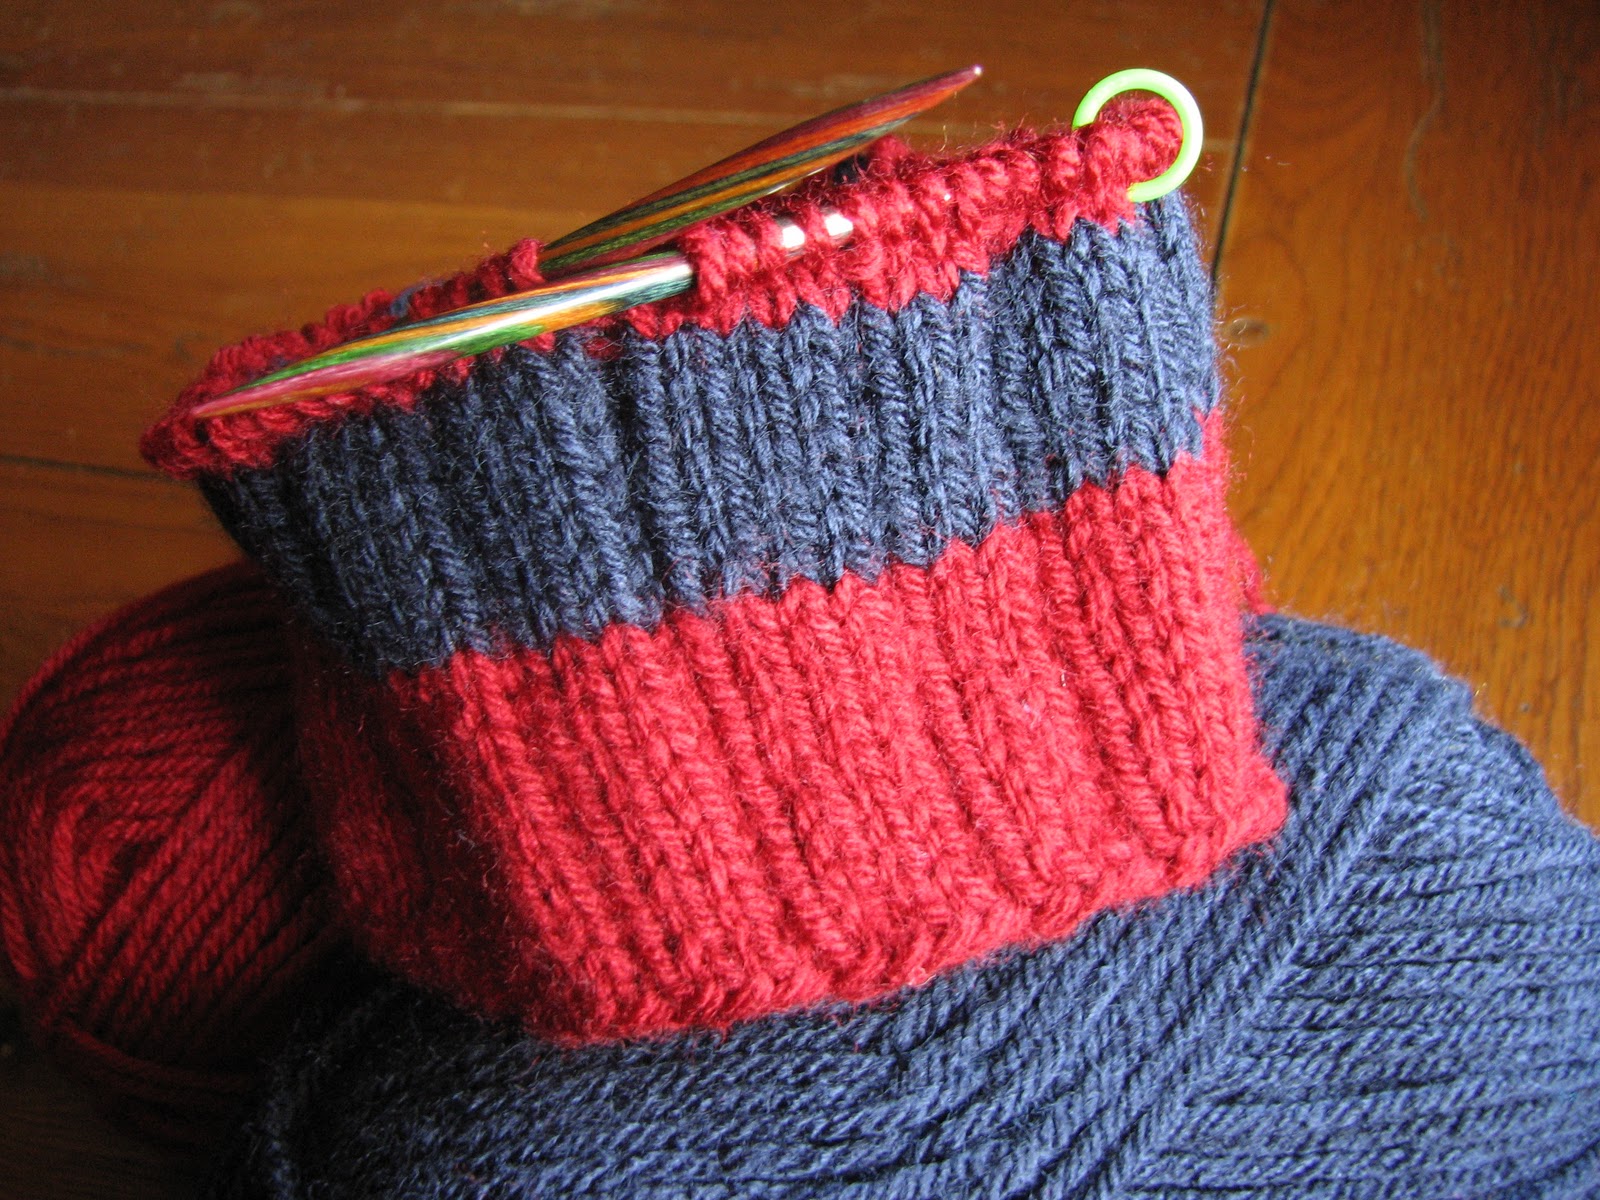
More rib-a-roni hats
I love this simple pattern for hats.
So I knit one for my nephew. (He is one and positively adorable.)


Yarns: Vanna's Choice (Lion Brand) Cranberry and Navy (nephew's hat). Olive, Rust and Chocolate (for new baby hat). (I purchased this yarn at Michael's, Hobby Lobby and Joann Fabrics.)
Needles: Options Harmony Wood Fixed Circular (Size 7), 8" Harmony Wood DPNs (Size 7)
Pattern: Rib-a-roni Hat
After I get a couple more projects off the needles, I will be knitting up three more of these: one for my youngest, one for my middle and one for my main squeeze. (My main squeeze is the love of my life. My husband for almost 15 years.)
So I knit one for my nephew. (He is one and positively adorable.)
(Click on image to see larger version.)

(Click on image to see larger version.)
And then I knit one for my cousin's soon-to-be-born baby boy. (He doesn't have a birthday yet and I am guessing he will be positively adorable as well.)

(Click on image to see larger version.)

(Click on image to see larger version.)
Yarns: Vanna's Choice (Lion Brand) Cranberry and Navy (nephew's hat). Olive, Rust and Chocolate (for new baby hat). (I purchased this yarn at Michael's, Hobby Lobby and Joann Fabrics.)
Needles: Options Harmony Wood Fixed Circular (Size 7), 8" Harmony Wood DPNs (Size 7)
Pattern: Rib-a-roni Hat
After I get a couple more projects off the needles, I will be knitting up three more of these: one for my youngest, one for my middle and one for my main squeeze. (My main squeeze is the love of my life. My husband for almost 15 years.)
Color Change Scarf
When I first saw the pattern for the Color Change Scarf on the Purl Bee blog, I knew that this was a project for me. I didn't want to invest as much money into the yarn as the project outlines, so I visited a local yarn store and picked up a skein that I love.
Getting off track for a moment: How do you say "skein"? Do you say "skane" or "skeen"? I have always pronounced it "skane" ... is that correct? Merriam Webster is telling me "skane" so I guess I'll stick with my old tried and true pronunciation of that word.
Ok, back to the scarf.
Here's a picture of it so far. I've only knit about 10 rows or so ... I have a long way to go!

(Click on image to see larger version.)
The yarn is just so purty. Don't you agree? I bought it at a local yarn store and they have several other colors of variegated yarn that I loved as well. It was hard to make the choice! But good yarn isn't cheap (but oh, so worth the money!) ... so I just picked the one I loved the most.
Only 64 more inches to go and I'll be done!
Yarn: Cascade Heritage 150 Paints in Juniper (9997)
Needles: Clover 29" No. 7 circular needle
Pattern: Color Change Scarf
While I was knitting this the other day at our homeschool co-op, one of my knitting buddies taught me a little trick. Maybe you already know this trick ... but I didn't and I was so happy to learn this! Really, I can't tell you how ridiculously happy I was to learn this because I was dreading keeping track of RS (right side) and WS (wrong side) rows on this scarf.
Here's the trick: To keep track of which side of your knitting you are on, find your tail. If your tail is hanging on the left, then you are on the RS of your knitting. If your tail is hanging on the right, then you are on the WS of your knitting. (Remember the little phrase: "Left is right and right is wrong"?)
Isn't that just the best trick you have heard all day? Thanks, Alyce!
Legwarmies finished!
Ok, I didn't speak the truth. I told you in my last post that pictures and details on this project were coming soon. I guess soon is a relative term. For me, soon means three months.
Here are the legwarmies in all of their cuteness:

Yarns: Berroco Love It in Walnut (3221) and Soiree (3240) (purchased from a local yarn store)
Needles: 6" Harmony Wood DPNs (Size 3)
Pattern: Legwarmies (on Ravelry) or Legwarmies (on designer's blog)
Lessons learned from this project: It pays to pay attention to your rows! I wanted the rows in the legwarmies to start out thick, get thinner near the center and then widen gradually again at the other end. It doesn't really show at all in the finished product, but I have a couple stripes that are not the number of rows they were intended to be. Oh well!
Here are the legwarmies in all of their cuteness:

(Click on image to see larger version.)
Yarns: Berroco Love It in Walnut (3221) and Soiree (3240) (purchased from a local yarn store)
Needles: 6" Harmony Wood DPNs (Size 3)
Pattern: Legwarmies (on Ravelry) or Legwarmies (on designer's blog)
Lessons learned from this project: It pays to pay attention to your rows! I wanted the rows in the legwarmies to start out thick, get thinner near the center and then widen gradually again at the other end. It doesn't really show at all in the finished product, but I have a couple stripes that are not the number of rows they were intended to be. Oh well!
Wednesday, July 14, 2010
guess what I finished today?
Legwarmies!
Had an hour while the boys swam to sit, rip out a few rows and then knit the cuff. The Elizabeth Zimmerman method for binding off is very nice.
Picture and details coming soon!
Had an hour while the boys swam to sit, rip out a few rows and then knit the cuff. The Elizabeth Zimmerman method for binding off is very nice.
Picture and details coming soon!
Monday, July 12, 2010
weekend knitting
Took a road trip to Minnesota this weekend with my family and had hours to knit in the car. Started out the trip by trying to finish up the legwarmies for my nephew. Only had the cuff left to do ... easy peasy, right? Wrong. It had been months since I had done the other cuffs, so I forgot that when changing colors/moving on to the cuff portion, I first need to do a round of straight knitting (stockinette). Oops. I changed colors and went right into the 2x2 rib. Pure ugliness to see my mistake. I don't do well ripping out rows and getting my stitches back on the needles, so I put that project aside and will try to fix it later today when I am well-rested and sitting in a quiet room. I could have tried to fix it in the van, but I was a bit fixated on keeping my eyes peeled for the next truck rollover on the highway (we saw two in a matter of 30 minutes).
I brought some fun colors of Sugar 'n Cream yarn along and decided to take a stab at a Ballband Dishcloth. I have eyed this pattern on Ravelry for quite some time and once I cast on and really took a look at the pattern, I found it was a cinch. Made for a nice knitting project on the road since the pattern is easy to remember once you get a few rows under your belt.
My husband helped me choose the color combo. Will go nicely with the smattering of bright colors I have chosen for my Fiestaware dishes. The colors of this washcloth are very cheery ... I love it! (And washing dishes is not my favorite thing to do, so if I can have something cheery to look at while washing ... all the better!)
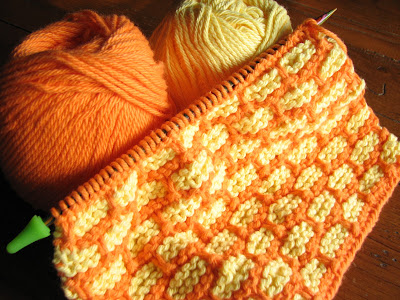

(Click on image to see larger version.)
I only had DPNs in size 8, so I had to use my needle point protectors to stop the ends of both needles. Worked out great. I'll have to remember that trick because good needles are expensive ... so if I can get by using DPNs for more projects that will be wonderful!
Looking forward to finishing this cloth up today and possibly casting on another one! Oh, wait. I have to fix the cuff on the legwarmies first. Maybe that will be motivation to get those done so I can knit up another dishcloth!
Yarns: Sugar 'n Cream Hot Orange, Sugar 'n Cream Yellow (available at Michael's)
Needles: 8" Harmony Wood Double Pointed Needles (Size 8)
Pattern: Ballband Dishcloth
The completion time for this dishcloth is supposedly 1.5 hours. After 1.5 hours, my husband looked over at me and smiled. We both know that whatever the stated completion time for a project is, for me ... double it. At least. Granted, we had three boys who needed to stretch/run/take potty breaks every couple hours and I was watching the traffic pretty closely ... but I will admit, I am a slow knitter. That's ok with me, though. I love knitting no matter how long a project takes!
(Dishcloth tip: While at my friend's house up in Minnesota, I was looking at her knitting books and read that you aren't supposed to dry knitted dishcloths in the dryer. No wonder my dishcloths end up looking like a washcloth for a doll instead of for humans! From now on, I will wash them and then wring them out by gently rolling them up inside a large towel to press out the moisture ... and then I will hang them to dry. Voila! No more tiny, faded washcloths!)
Monday, May 31, 2010
can you give yourself an award?
If I could give myself an award, it would be the "Slowest Knitter of the Year" award or something like that. Seriously. I started some baby legwarmies for my nephew in February of this year and I am still. not. done. Here they are on the needles.

Aren't they cute?
Sure hope CalPal's legs aren't too big for them once I get them finished!
I think I'll try to finish them up today while I watch a little Lark Rise to Candleford. Details on the project coming as soon as I get them off the needles!

(Click on image to see larger version.)
Aren't they cute?
Sure hope CalPal's legs aren't too big for them once I get them finished!
I think I'll try to finish them up today while I watch a little Lark Rise to Candleford. Details on the project coming as soon as I get them off the needles!
Wednesday, March 31, 2010
rib-a-roni hat
Let me tell you, I am no experienced knitter. My mom taught me to knit when I was little ... but I didn't really take it up until a little over a year ago when a dear friend invited me to a monthly knitting group. I started out with a dishcloth and then jumped to a HUGE baby blanket and some cute legwarmies (posts coming soon). This was actually the fourth project I have attempted and I am just tickled pink with how it turned out! (And I love that it looks kind of complicated ... but it really isn't!)


Can you believe that I started this hattwo three four five six seven eight times before I finally got it right? And when I got to my decrease rows to do the crown, I skipped over 2 lines of the pattern ... but didn't notice until I was several rows in. Grrrr. Let me tell you, I thought this hat was a goner at that point and I actually broke it to my son that I would have to rip it all out and start over. Instead I ripped out almost 10 rows and was able to get ALL the stitches back on the needle (which is like an Olympic event for me ... I require complete silence and everyone must leave the room). I felt like I had just won a gold medal after I got all those stitches back on!


(Click on images to see larger versions.)
Can you believe that I started this hat
This was my first hat and I am quite pleased with how it turned out. My dear son was quite pleased as well. He must have tried it on more than a dozen times as I was knitting it so we could get a custom fit. He likes hats to be a little longer and cover his ears entirely ... so I tweaked the number of rows in the pattern to get the fit he wanted.
Once I cast on the correct number of stitches (c'mon, how hard is that???) and figured out how to join the stitches so I could knit in the round (watch this video if you don't know how), this hat was a very easy, enjoyable knit. In fact, I picked up yarn a few weeks ago to knit two more hats for the other two boys in the house. (And my husband, the biggest boy, has also said that he would like one in black.)
Knitting is so enjoyable ... but even more enjoyable is when the recipients truly love the finished product!
Yarns: Vanna's Choice (Lion Brand) Charcoal Grey and Rust.
Needles: Options Harmony Wood Fixed Circular (Size 7), 8" Harmony Wood DPNs (Size 7)
Pattern: Rib-a-roni Hat
Lessons learned from this project: ALWAYS count the number of stitches you cast on at least two times before you continue knitting. (I always do this anyway, but for some reason in this project, the stitches kept disappearing or multiplying in my cast on row. Maybe it was because I was trying to watch Emma at the same time. I just love that movie. Doesn't Romola Garai do a fabulous job? And Jonny Lee Miller is pretty easy on the eyes.) ALWAYS read the pattern carefully and know exactly which line of the pattern you are on and what line you are moving to next. Don't be afraid to mark up your pattern with a pencil!
Subscribe to:
Posts (Atom)